NOTE:
If the data is only on this drive then
by definition it is NOT a
backup, since a backup is a secondary copy just in case the first one
fails. If the drive truly had a backup then no data would be at risk,
just so you know.
External desktop hard drives
Downloads

External hard drives

Portable hard drives

External & portable hard drives
=====================
External Drives:
If your WD external drive is not recognized, it can be caused by one of the following problems:
- Your driver may be corrupted. The symptoms of this problem can vary -
The majority of the time however, the drive may request a driver, or
will not appear as a connected device. You will need to contact
Microsoft or your System Manufacturer for assistance in resolving this
issue, as we are unable to provide assistance in diagnosing your OS.
 |
Important:
It has been reported to us that some users have been able to resolve this issue using the SFC Command in a Command Prompt.
When contacting Microsoft or your System Manufactuer, providing them
with this information may assist in resolving this issue. Please note
that WD Technical Support cannot assist with the usage of this command
line program, and is not responsible for any damage to your system or
data it may cause.
|
- Your drive may be damaged or have failed. A good test for this is to
try the drive in another system. If the issue continues to occur, than
this is most likely the case. For assistance replacing your drive under
warranty see Answer ID 8: How can I replace a product under warranty?.
- In some cases you may need to install a drive in order for your
drive to be recognized. Check the table below to see if your model drive
requires a driver to be installed besides the one that is included in
your Operating System. Please note that this table includes any drive
that has a driver for any reason.In most cases the drivers listed are
not required for the drive to function, but add some additional
funcationality that the OS supplied driver cannot provide. If an OS is
not listed in either column, your WD external drive is not supported on
that OS. If a driver is available, select the OS in the list to go to
the download page for that driver.
Select the type of drive you would like to find a driver for:
Where to find the PID from Windows Device Manager | Where to find the PID from Apple System Profiler
Please use the table below as a reference to available downloads for WD products by PID.
|
|
|
|
|
|
|
|
|
|
WDBAAF
WDBAAG
|
|
1058
|
1110
|
My Book 1110
|
|
WDBAAH
|
|
1058
|
1111
|
My Book 1111
|
|
WDBAAJ
WDBACH
|
|
1058
|
1112
|
My Book 1112
|
|
WDBAAA
WDBAAB
WDBABM
WDBABW
|
|
1058
|
070A
|
My Passport 070A
|
|
|
WDBAAC
|
|
1058
|
070B
|
My Passport 070B
|
|
WDBAAE
|
|
1058
|
070C
|
My Passport 070C
|
WD Elements Desktop
My Book Essential
Interface:
USB 3.0 and USB 2.0
=======================
My Book Essential 1,5 TB (wdbaa
f0015hbk-01)
[WD Elements Desktop, 1.5 TB WDBAA
U0015HBK
the drive inside is WD15EARS with 64MB Cache]
 | Available Downloads |
Updating firmware on a My Book or My Passport
=====================
SES (SCSI Enclosure Services) driver
Important: |
|
Problem:
Windows attempts to install a driver called the
SES Driver
every time I connect the drive to a computer. What is this driver, why
is it required and how can I get rid of the repeated prompts to install
the driver?
Cause:
Your new Western Digital My Passport/My Book hard drive requires a
special communications channel (SCSI) between your PC and the drive to
enable certain features such as password protection, LED control, and
access to the drives label if applicable.
At install, the Windows operating system detects this SCSI
communications channel and attempts to install a SCSI Enclosure Services
(SES) driver. This driver is only used by your hard drive and is
installed by default when you first attach the drive to a computer.
However if you did not install the driver upon first install and
chose not to install WD Smartware, Windows will continue to prompt you
to install the driver each time you connect the drive to a computer.
This will continue to occur unless the SES driver is installed.
Solution:
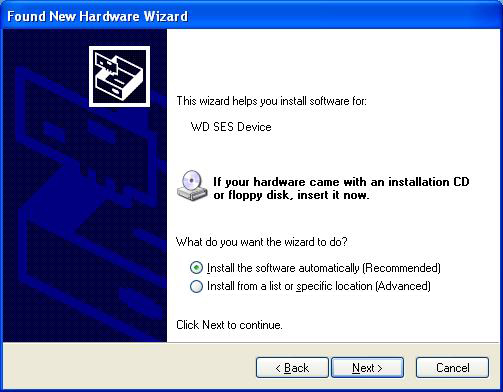
We recommend that you install the driver by selecting the
Install the software automatically
option on the popup screen. Windows will automatically find the
Windows SES driver online, and the prompting will disappear. This will
not affect your operating system negatively in any way. If Windows is
unable to find the driver you can download a copy of the driver from
Answer ID 5419: WD SES driver download and instructions for recovering the WD SmartWare installer.
 |
Note:
If you can't get the SES driver to install, automatically, you can
install the SES driver, manually. To install the WD SES driver,
manually, follow the steps below.
|
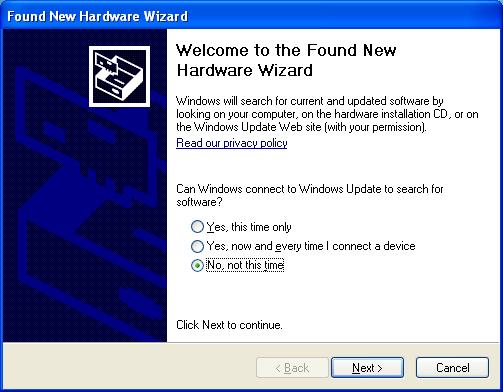
- When the Found New Hardware Wizard starts, choose No, not this time and click on Next.
- The software will ask for the driver for the WD SES Device that it found. Click Install from a list or specific location (Advanced), and click Next.

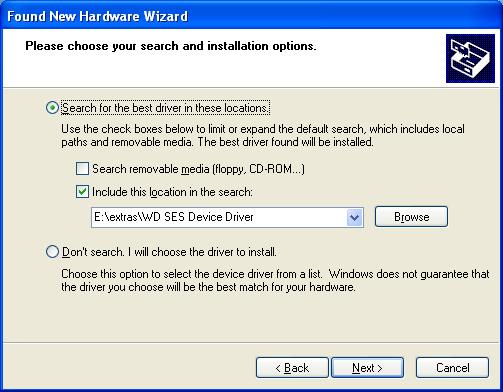
- You will want to specify the location of the driver, so check the Include this location in the search. Then have it search on the Virtual CD in the x:\extras\WD SES Device Driver folder. (“x” would be the drive letter of your Virtual CD).
Note: This window may look different depending on your version of Windows.
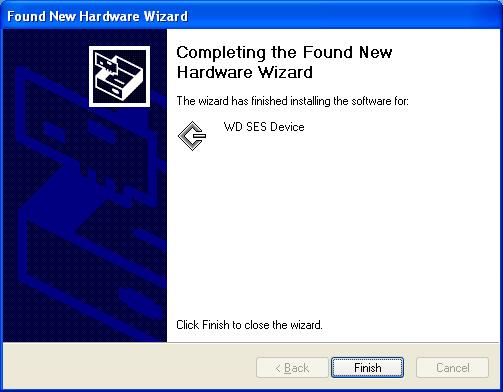
- Windows will install the driver after it finds it.
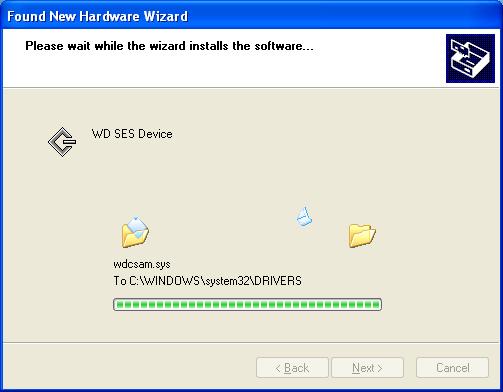
- Click on Finish when it is done. Your drive and Virtual CD should be fully installed.
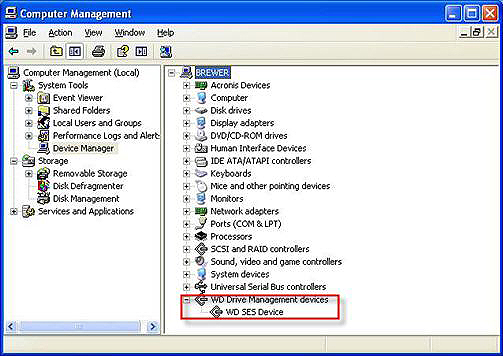
- The driver should show up in Device Manager under WD Drive Management devices.
|
Note:
If the drive is not working properly, or you get a driver error when
installing SmartWare, make sure that this driver is present and doesn’t
have any Exclamation Points or Question Marks.
|
=====================
Direct Connection Drives (USB/Firewire/eSATA)
- There are a few My Book drives that have firmware updates to resolve
minor issues. You can check to see if your drive has a firmware update
by vising our Downloads Library
support.wdc.com
WD SES driver download and instructions for recovering the WD SmartWare installer
http://wdc.custhelp.com/app/answers/detail/search/1/a_id/5419
http://wdc.custhelp.com/app/answers/detail/a_id/1708/related/1/session/L2F2LzMvc25vLzEvdGltZS8xMzMxMjM4MjgxL3NpZC9pcEVubEJTaw%3D%3D
My Book Essential software update for Windows users
WD smartware download? - Western Digital Community
Where to find a driver for a WD product or the operating system (OS) fails to recognize a WD drive
Data recovery services
Use first SIW - System Information for Windows (free version from
http://www.gtopala.com) Use on the drive before opening it up
Follow these steps and check if it helps
Method 1:
- Click on start, go to control panel.
- Click on Administrative Tools.
- Go to Computer Management, and open Disk Management.
- Check if it is recognized correct there.
Method 2:
Try running this below fixit and check if it helps:
http://windows.microsoft.com/en-US/windows-vista/Tips-for-solving-problems-with-USB-devices
=========================
=========================
The drive is recognized as a Initio Default controller
Initio combo default controller
I read in another forum that the "initio default controller"
driver is the software for how the SATA drive "talks" to the USB port,
the actual Controller for external hard drive.
Seagate FreeAgent Desk recognized as Initio Default Controller
It appears that the enclosure is identifying itself with the Product
ID and Vendor ID of the Initio (INIC-16xx ???) USB-SATA bridge chip,
rather than the ID of the FreeAgent product. The FreeAgent ID would be
stored in an 8-pin serial EEPROM chip attached to the bridge.
This
suggests that the bridge board may have a problem. That said, it may be
that the bridge board identifies itself as a "Default Initio" device if
it cannot detect a hard drive.
It may be possible to reprogram
the EEPROM via the USB interface, in which case you would need to obtain
tools from Seagate, assuming they are available. Otherwise, if you are
prepared to void your warranty, remove the hard drive from the enclosure
and connect it directly to a SATA port on your motherboard, or install
it in a third party enclosure.
You can see the Initio device using Microsoft's UVCView utility:
http://www.users.on.net/~fzabkar/USB_IDs/UVCView.x86.exe
=============================
External HD to Internal HD after firmware failure Options
Since the 2 TB drive is a SATA drive and my computer has IDE
connectors, I bought a 2TB capable SATA to IDE converter, attached it to
the drive, and attempted to install this 2 TB drive as an internal
drive as a slave drive. The drive was recognized on the computer, both
in the BIOS and by the Device Manager. However, the computer did not
assign a drive letter to it because the
disk had not been initialized on the PC.
Since initializing was not the
same as formatting and Windows did not warn of a data loss, I went ahead
and initialized the drive. So, now I have an initialized drive but
still no drive letter and more questions than answers at this point on
proceeding forward.
Some resources are indicating that
once you initialize the disk you cannot retrieve the data, other are
saying you can, so I am uncertain what to believe at this point.
------------------------
If the data is only on this drive then
by definition it is
NOT a backup, since a backup is a secondary copy just in case the first
one fails. If the drive truly had a backup then no data would be at
risk, just so you know.
On the other hand,
initializing
the drive does not give any drive a drive letter... Formatting does.
The
drive will not be seen on Windows explorer until it is given a file
system that Windows understands after the new initialization as an
internal drive.
Good news are that
if you are were able to initialize the drive then it means it is not encrypted.
I can suggest you to try TestDisk,
which is free and has given good results here, if it doesn't work for
you then yes, try the software you have in mind and many different ones.
Since the drive itself is working then trying different softwares is
the way to go.
--------
The computer alone won't read the data on the drive while it still needs to be formatted.
That's when TestDisk, File Scavenger, Recover My Files and many other data recovery softwares come into play: They can.
If
you initialized the drive as a Master Boot Record (MBR) patition table,
then TestDisk will try to repair it first to grant you direct access to
the files without formatting, if the file system cannot be repaired
then most data recovery softwares tend to extract the files directly
from the lower levels (Sectors and clusters) of the drive.
-------------------
If the USB-SATA bridge board in your WD enclosure has an Initio
INIC-1607E chip, then your data are hardware encrypted, whether or not
you have set a password. This is why the PC failed to recognise the
partitions. Now that you have initialised your drive, you have wiped the
encrypted partition information, but hopefully your encrypted data are
still intact.
Your easiest course of action is to obtain another
MyBook Elite and swap the drives. Then run TestDisk or "Partition Find
and Mount". Hopefully your data will be accessible. If not, then one
commercial tool that has worked for others is "Active File Recovery for
Windows".
That said, a failed firmware update usually causes the
Initio chip to identify itself as an "Initio default controller". In
this mode it has prepared itself to receive a firmware download. If this
is the case, then you should be able to update the firmware simply by
repeating the procedure, ensuring that no other application is
attempting to access the device at the same time. The firmware is
written to an 8-pin serial flash memory chip on the bridge board, not to
the drive itself.
------------------------
Here is an enlightening discussion:
http://forum.hddguru.com/disk-with-sata-usb-adapter-remove-virtual-rom-t18492-20.htmlThe
OP in that thread has done some excellent detective work on a HP
SimpleDrive which appears to be an OEM version of a WD SmartWare
product. If you are unable to apply the firmware update, then see the
last page for a simple hardware hack.
---------------------
---------------------
files. extremeoverclocking. com / browse.php? c=21
Connect the drive back up to the usb adapter, run the software at
files . extremeoverclocking . com / file . php ? f=197
Follow the directions at
http://www.dedoimedo.com/computers/passport-vcd.htmlAnd the hidden vcd will be gone.
----------------------
I don't believe HP's tool can write to the VCD. In fact the OP in
your link appears to have fooled himself by first hiding the VCD using
WD's tool. After reformatting, he then claims that an increase in the
reported size of the user partition is evidence that the VCD's data area
has been reclaimed. In fact prior to the reformat, Windows shows a WD
SmartWare volume of size 615 MB. Afterwards he claims that an increase
in the user area from 595.51GB to 595.52GB is evidence that the VCD is
gone. Clearly his arithmetic is poor.
595.52GB - 595.51GB = 0.01GB = 10MB
So where are the other 605 MB?
In
Gaucho's case the label on his drive shows a capacity of 625142448
LBAs. However, after connecting the drive directly via SATA, the OS
reports a capacity of 319362912256 bytes.
The difference, in sectors, is ...
625142448 - (319362912256 / 512) = 1386760
... which is close to the figure stated by DR-Kiev.
The difference, in bytes, is 710 MB.
I
wonder whether the VCD partition is actually visible to disc utilities,
or if it is hidden in a HPA. To this end, it would be interesting to
see how many LBAs are reported by the software.
AIUI, Gaucho's
problem is that the HP drive enumerates as a multifunction device, first
as a VCD, and then as a USB mass storage device. Windows can handle
this, but his TV media player cannot.
To prevent the drive from
identifying as a VCD, the VCD needs to be disabled in the bridge chip's
firmware. This is apparently how WD's firmware updates tackle the issue.
BTW, I believe you can hide the VCD in Windows merely by disabling the VCD device in Device Manager.
----------------------
Everything I have seen on the WD site, actually reinstalls the VCD manager.
I have one of these wd usb/sata adapters in my hand, and it will properly read a non vcd'd drive without problem, So all that is needed is to remove the hidden partition from the drive.
If the Hp tool doesn't work, we can dig deeper, but there is nothing to lose in trying.
----------------------
Like i said before , there is in the end of physical drive locate HFS
boot loader partition, wich contains VCD. It is not encrypted. Via USB
you couldn't see that sectors. Its locked.
Inic1607E was programmed for using this "loader" for mount and decrypting main partition. BTW. Open physical drive with WinHex ... jump on to that sectors in the end and you will see all you need.
----------------------
i think that initio chip in the adapter, encripts
partition, and doesn't allow you clear see the partition when the disk
is directly connected to PC.
INITIO doesn't answer my questions, resellers do the same..
i will try to disconnect flash data pin..
----------------------
I connected the disk directy to a sata bus, and i used gparted live to watch disk partitions.
gparted shows that the disk has no partition, because gparted is seeing an encrypted MBR. That's why it is telling you that there is nothing there.
Use a disc editor such as WinHex or HxD to view the first two sectors.HxD -
Freeware Hex Editor and Disk Editor:
http://mh-nexus.de/en/hxd/I believe LBA 1 should have a repeating pattern of 16-bytes (128 bits). These will be encrypted zeros.
Use
HxD to examine the end of the physical drive (not logical drive). Note
the number of the last sector. That should tell you the visible capacity
of the physical drive.
The same disk used with the SATA-USB adapter, has a V-CD and a NTFS partition.
Use HxD to view the same sectors. This time you will see an unencrypted HD partition, but not the VCD.
Alternatively, you could Microsoft's Sector Inspector:
http://www.users.on.net/~fzabkar/SecInspect.zipExtract
the above archive to the one folder and execute the SIrun.bat file. The
procedure will generate a report file named SIout.txt.
----------------------
here what i did:
-i realized a bootable bartPe with HxD (portable) on it (just because i don't want to install anything on this pc)
-i
connected the disk with the adapter and saved the sector 0 (annexed
file sector0withAdapter), sector 1 (annexed file sector1withAdapter) and
the last sector (sector 623769599) (annexed file
sector623769599withAdapter)
-i connected the disk without adapter
and saved the sector 0 (annexed file sector0withoutAdapter), sector 1
(annexed file sector1withoutAdapter) and the last sector (sector
625142447) (annexed file sector625142447withoutAdapter)
some observations:
1) sector
one with adapter, is composed by repeating sequenze ( this is the
sequence: 96 6C F5 0F 30 E9 74 2D 2F 43 EF BE 2C F2 18 92 )
sector one with hard disk directly connected to PC is composed by zeros.
2) sector zero is in clear if readed with the adapter.
sector zero is cyphered if readed directly on the hard disk.
3)with adapter the size of the hard disk reduces by 1372848 bytes (that is near to the size of the
V-CD)
I was in error, because that difference is in sectors, not in bytes.
infact 1372848 (SECTORS) * 512= 702898176 (Bytes)
i copied hard disk sectors from sector 623769600 to sector 625142447
In these sectors i found the files contained in the CD-ROM (not encrypted!!): HPLauncher.exe and
Autorun.inf
I even converted these sectors to string, and i found some readable strings:
---------------------
The first anomaly I'd like to clear up in my mind is in regard to the
slight differences in the user area before and after formatting.
Your
hex dump of sector623769599withAdapter is of the last sector of the
physical drive that is visible via the bridge. It shows a backup copy of
an NTFS boot sector which belongs to a partition beginning at sector 63
(= 0x3F) and whose size is 623769537 (= 0x252DF7C0 + 1) sectors. This
is consistent with a user area of 623769600 sectors, as per the drive's
original format.
Your hex dump of sector0withAdapter is the
result of the latest reformat. It shows a partition table with a single
NTFS partition beginning at sector 63 and whose size is 623755692 (=
0x252DC1AC) sectors. Therefore the total user area now appears to be
623755755 sectors. This is 13845 sectors less than the previous figure.
It also corresponds to about 7.1 MB of lost disc space.
This
difference can be accounted for if we assume that your formatting
utility ends a partition on a cylinder boundary. A logical track has 63
logical sectors, and a logical cylinder has 255 logical tracks or heads.
Dividing the user capacity by 63 x 255 should give us an integral
number of cylinders, ie ...
623755755 / (255 x 63) = 38827
Therefore,
it would appear that the discrepancy in the formatted capacity of 7.1MB
is due solely to the formatting methodology, and corresponds to the
size of the last partial cylinder. This also accounts for the 0.01GB
difference observed by the blogger at Steve's URL.
As for the
question of whether you could force your TV media player to see the USB
mass storage device before the VCD device, I don't believe this would be
possible. Dr-Kiev cautions you not to touch the VCD data area, as this
is necessary for the INIC-1607E's encryption function. Having said that,
I don't understand why your VCD now has a capacity of only 1MB, nor do I
understand why your hardware encryption is still functional, if after
reformatting in SATA mode, you have overwritten the VCD data area. :?
If
OTOH you have not touched the VCD area, and if you wish to observe how
the device behaves in the absence of the VCD data, then you could clone
those sectors (623769600 - 625142447) to a backup drive (or CD) before
zeroing them, or you could try substituting a regular SATA drive that
has been zero-filled.
I believe your only plausible solution is
to force one of WD's utilities to update the firmware of the Initio
bridge. Perhaps you could use Microsoft's UVCView to see how your HP
device identifies itself, compare that to a My Book or Passport drive,
and then edit an appropriate file in the update package (but not the
firmware image itself).
BTW, if you don't need hardware encryption, then you could buy a third party enclosure.
References:
UVCView:
http://www.users.on. net/~fzabkar/USB_IDs/UVCView.x86.exe
The Windows 2000/XP MBR:
http://mirror.href.com/thestarman/asm/mbr/Win2kmbr.htmThe NTFS Boot Record: Boot Sector:
http://mirror.href.com/thestarman/asm/mbr/NTFSBR.htm
----------------------
It appears that
the VCD image is a cross-platform ISO built with CDEveryWhere:
http://www.cdeverywhere.com/features.shtml"Create Hybrid CD image. Joliet (Win) / HFS (Mac) / RockRidge (Unix/Linux) / ISO9660 (Industry Standard Format)."
"CDEveryWhere supports all 4 file systems - so your CD data can be shared seamlessly across platforms."
BTW,
Dr-Kiev is saying that, after deleting the VCD image, you will have
lost the hardware encryption functionality of the Initio bridge. You
could verify this by formatting your drive via the bridge, and then
viewing it via SATA.
Of course none of this helps you tackle your
initial problem.
It appears that the VCD can only be disabled by
updating the firmware in the bridge's flash memory.You could try
lifting the clock pin, but I suspect that the resultant "default Initio
controller" won't provide you with a USB mass storage device.
---
It may be interesting to see how the bridge board
behaves on its own, ie with the drive disconnected. Is it detected as a
"default Initio controller"? Does the VCD still appear, albeit with zero
capacity?
In Linux you can use LSUSB or USBVIEW to display information about the connected USB devices.
http://linux.about.com/cs/linux101/g/usbview.htmhttp://linux.about.com/library/cmd/blcmdl8_lsusb.htm
----------------------
usbview (for windows) detects the usb adapter with the hard disk as shown:
if i connect the adapter without the hard disk, usbview can't see any usb device.
----------------------
ok, now, beginning from sector 623769600 till the
end (sector 625142447) the sectors are all zeroized, apart of these 2
sectors: 625137672 and 625141759 (see annexed files)
the disk still works well (i can read,write and even format)
now i'll try to zeroize these 2 sectors (one at time)
question: one sector begins with WD, the other one with NTFS. what does it means? why it is placed at the end of the hard disk?
----------------------
----------------------
You can see the Initio device using Microsft's UVCView utility:
http://www.users.on.net/~fzabkar/USB_IDs/UVCView.x86.exeTestDisk:
http://www.cgsecurity.org/wiki/TestDiskPartition Find and Mount:
http://findandmount.comActive File Recovery for Windows
http://www.file-recovery.net/
=============================
WD SmartWare Virtual CD Manager 1.0.7.4
Remove WD smartware
After many return with Western Digital, I learned that the virtual CD
automatically installed on their external hard drive 1TB CAN NOT BE
DELETED. I find it unacceptable that buying a 1TB capacity,
approximately 700 MB is used by software, again, is a virtual cd that we
can not eject from his office in the dismantling every time by Disk
Utility.
---------------------------------
I have the same problem, I can not eject it, but I use "Disk Utility" and
got 999.5 GB in 1 TB. It does not solve the problem but I have 2
partitions of 500 GB . The WD response: "I'm sorry, but the virtual
drive Smartware''''can not be deleted but disabled." And most
importantly, it eats 700 MB of space of 1 TB.
----------------------------------
Disable the VCD - WD SmartWare
The VCD is necessary if you wish to install WD SmartWare or if you want
to use the encryption and password protection features on the drive. If
you don't wish to run WD SmartWare or use the security features, you can
disable the VCD following the steps below. The VCD can be re-enabled by
running the VCD manager.
- All AntiVirus software MUST be disabled
- All Anti-Spyware software MUST be disabled
- NY and ALL programs that would require drive access during the update MUST be disabled
Failure to perform these precautions may cause data corruption/loss and/or drive failure.
How to install the Virtual CD Manager
Windows XP, Windows Vista, Windows 7
STEP 1: Firmware Update: Release 1.032 (11/16/09)
Before running the Virtual CD Manager, you must first update the firmware on your hard drive.
- Disconnect all other external drives from the computer except for the My Book or My Passport hard drive you want to update.
- Download the Firmware Updater for Windows.
- Unzip the file and double click to open the Firmware Updater.
- Click Continue to update the firmware.
- Verify the attached drive's serial number located on the back of the drive.
- Click Update Firmware.
- Click Accept the End User's License Agreement (EULA). The updater will scan the drive; this may take a few minutes.
- Once the updater is finished, click Exit.
- Turn off the drive - For My Passport, disconnect the USB cable. For My Book disconnect both USB and power cables.
- Wait 10 seconds. Reconnect the USB/power cables.
STEP 2: Download and run the VCD Manager
- Download VCD Manager for Windows.(WDSmartWareVirtualCDManagerforWindows-v1.0.7.4.zip) to your desktop.
- Unzip the utility (Extract the file using an extraction utility.)
- Double click WDSmartWareVirtualCDManagerforWindows-v1.0.7.4.exe.
- Click Continue to disable the VCD.
- Once the utility has found your drive, click Configure Drive and then click Exit.
- Turn off the drive - For My Passport, disconnect the USB cable. For My Book disconnect both USB and power cables.
- Wait 10 seconds. Reconnect the USB/power cables that have been disconnected in the previous step.
- Verify that the VCD no longer appears.
Source: wdc.com


 Firefox